ServiceNow Scenario Based Interview Questions 2026
Explain the behavior of the following access control scenario in ServiceNow:
1.Users with Role A, B, and C have Read access to the table with table.none ACLs.
2.Users with Role B have Read access to all fields in the table with a table.* ACL.
3.Users with Role C have Read access to the Priority field specifically.
1.Users with Role A, B, and C have Read access to the table with table.none ACLs.
2.Users with Role B have Read access to all fields in the table with a table.* ACL.
3.Users with Role C have Read access to the Priority field specifically.
1. Users with Role A:
Users with Role A will not be able to access any data in the table. While they have access to the table itself at the row level (via the table.none ACL), this does not grant them any access to individual fields at the column level. Since they do not have Read access to any fields (either through * or field-specific ACLs), they will be unable to view any data in the table.2. Users with Role B:
Users with Role B will have access to all fields on the table, except for the Priority field. The table.* ACL allows them to access all fields in the table, but a specific ACL on the Priority field restricts their access to it. Therefore, they will be able to read all fields in the table, except for the Priority field, which remains restricted.3.Users with Role C:
Users with Role C will have access only to the Priority field. They are granted read access specifically to the Priority field via a field-level ACL. However, they do not have access to the table.* ACL, which means they cannot access any other fields on the table. As a result, users with Role C can view the Priority field but will be restricted from seeing any other data in the table.
How to show inactive incidents to only ITIL admins and hide for all other users, explain different ways to achieve this?
There are two approaches to implement this scenario :
Method 1 : Using ACL
- Write Table.None ACL on incident table to allow only ITIL admin to see inactive incident as below :

Method 2 : Using Before Query BR
- Write before query BR as shown below, it checks if logged in user has ITIL admin role or not. If user has ITIL admin role then inactive incident will be shown otherwise it will be hidden.
BR Configuration :

BR Script :

Note : Here interviewer is likely assessing your understanding of Before Query Business Rules (BR) and Access Control Lists (ACLs). They may ask follow-up questions to explore the advantages and disadvantages of each method, or inquire about which method is more preferable in different scenarios and why. Be prepared to discuss these concepts in depth.
There are two approaches to implement this scenario :
Method 1 : Using ACL
- Write Table.None ACL on incident table to allow only ITIL admin to see inactive incident as below :
Method 2 : Using Before Query BR
- Write before query BR as shown below, it checks if logged in user has ITIL admin role or not. If user has ITIL admin role then inactive incident will be shown otherwise it will be hidden.
BR Configuration :
BR Script :
Note : Here interviewer is likely assessing your understanding of Before Query Business Rules (BR) and Access Control Lists (ACLs). They may ask follow-up questions to explore the advantages and disadvantages of each method, or inquire about which method is more preferable in different scenarios and why. Be prepared to discuss these concepts in depth.
How to show incidents to users only if they are part of current assignment group?
We can implement it by using ACL as shown below:
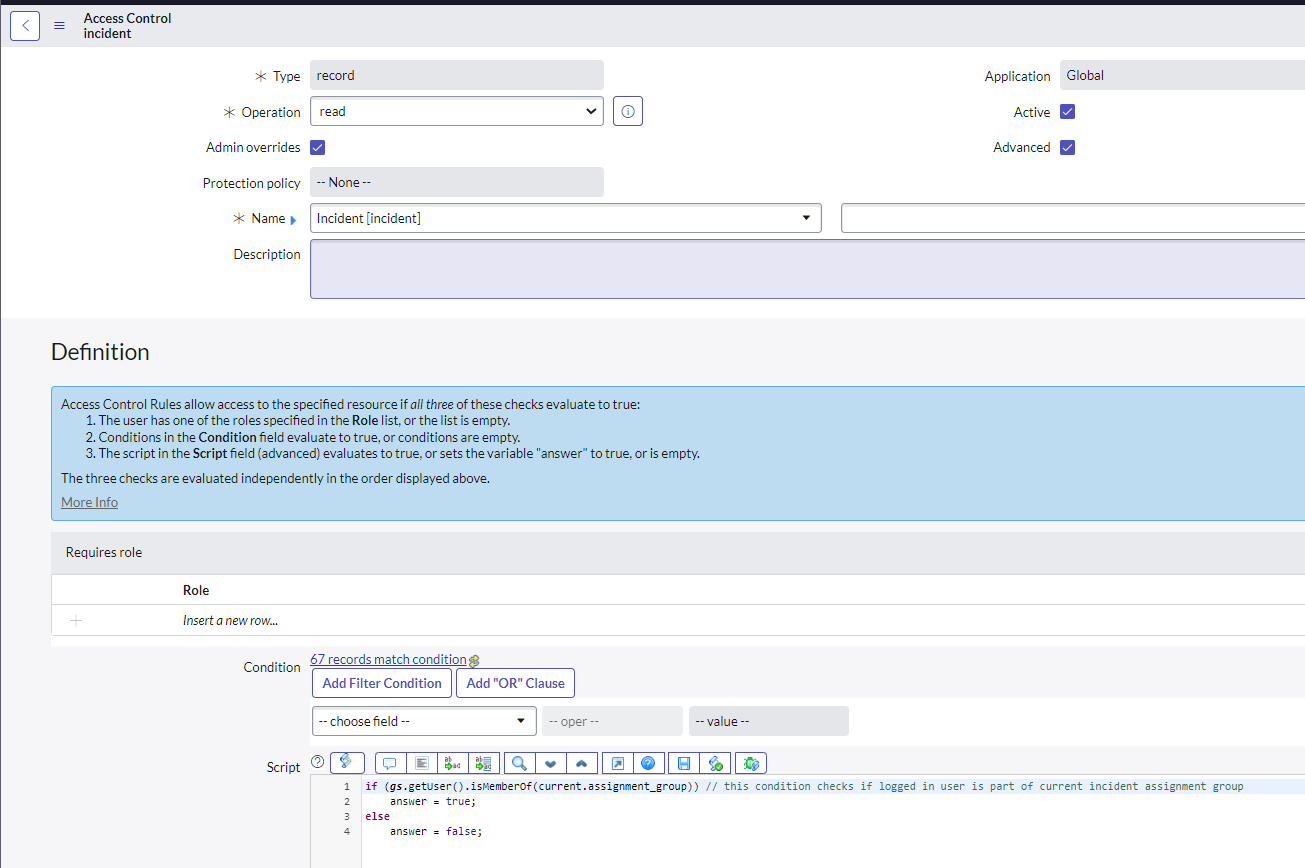
We can implement it by using ACL as shown below:
In workflow, We have run script activity which takes around 10 minutes to execute therefore workflow throws an error as 'Transaction Cancelled : Max execution time exceeded'. Why this issue occurs and how to resolve it?
There is transaction Qouta limit set in instance. If any transaction exceeds this limit then it gets cancelled. Generally it is set between 2 to 5mins so if we want our scenario to work then we can increase this value.
However increasing this value is not best practice or may create perormance impact, so rather you can plan to run such heavy long running scripts in background. To do so, we can write such scripts in Script Actions ( Script Actions runs asynchronously in the background ) and call them via workflow run script activity. This way workflow will trigger script in background and move ahead with next activities.
Note : Here Interviewer tries to understand if you know what script action does. They might further ask to explain different scenarios when we are supposed to write script in script actions and when to write it in script includes.
There is transaction Qouta limit set in instance. If any transaction exceeds this limit then it gets cancelled. Generally it is set between 2 to 5mins so if we want our scenario to work then we can increase this value.
However increasing this value is not best practice or may create perormance impact, so rather you can plan to run such heavy long running scripts in background. To do so, we can write such scripts in Script Actions ( Script Actions runs asynchronously in the background ) and call them via workflow run script activity. This way workflow will trigger script in background and move ahead with next activities.
Note : Here Interviewer tries to understand if you know what script action does. They might further ask to explain different scenarios when we are supposed to write script in script actions and when to write it in script includes.
When user opens any incident which has child incident then there should be message saying for assignee group members that "This incident is parent for INCXXXXXX", child incident needs to be resolved before resolving parent incident, how to implement this scenario?
Method 1 : Display BR with On Load Client Script
We can write display BR to check if current incident has any child incident. Store result in scratchpad object and access scratchpad in on load client script to show message accordingly.
Method 2 :On Load Client Script with GlideAjax
We can write onLoad Client SCript with GlideAjax and check if current incident has any child incidents in server side code.
Method 1 : Display BR with On Load Client Script
We can write display BR to check if current incident has any child incident. Store result in scratchpad object and access scratchpad in on load client script to show message accordingly.
Method 2 :On Load Client Script with GlideAjax
We can write onLoad Client SCript with GlideAjax and check if current incident has any child incidents in server side code.
All catalog items under order guide moves to In Progress simulteneausly and those are being worked parallely. I want those items to be worked on sequential order one after other, how to implement this?
We need to Configure a sequence in Process Automation Designer to fulfill items in order guides. To use this functionality, the Order Guide Sequential Fulfillment (com.glideapp.servicecatalog.order_guide_sequencing) plugin must be installed.
For more details, please refer Configure a sequence to fulfill items in order guides
We need to Configure a sequence in Process Automation Designer to fulfill items in order guides. To use this functionality, the Order Guide Sequential Fulfillment (com.glideapp.servicecatalog.order_guide_sequencing) plugin must be installed.
For more details, please refer Configure a sequence to fulfill items in order guides
How to show all incidents opened by the same caller as related list on incident records?
This scenario couldn't be achieved by adding related list directly. For such type of requirement we have to create relationships as shown below where custom relation between any two table can be defined.
Relationship to show all incident with same caller as that of current incident :

Once we create above relationships, it will be available in incident related lists to add on the form as shown below :
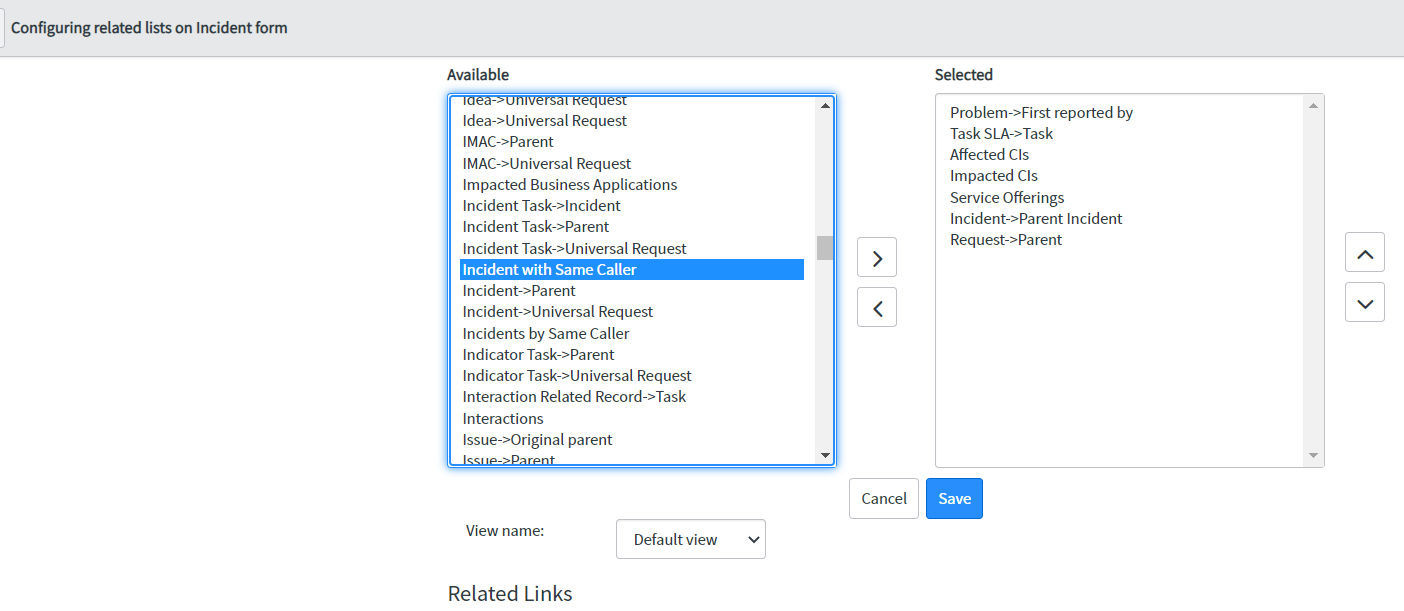
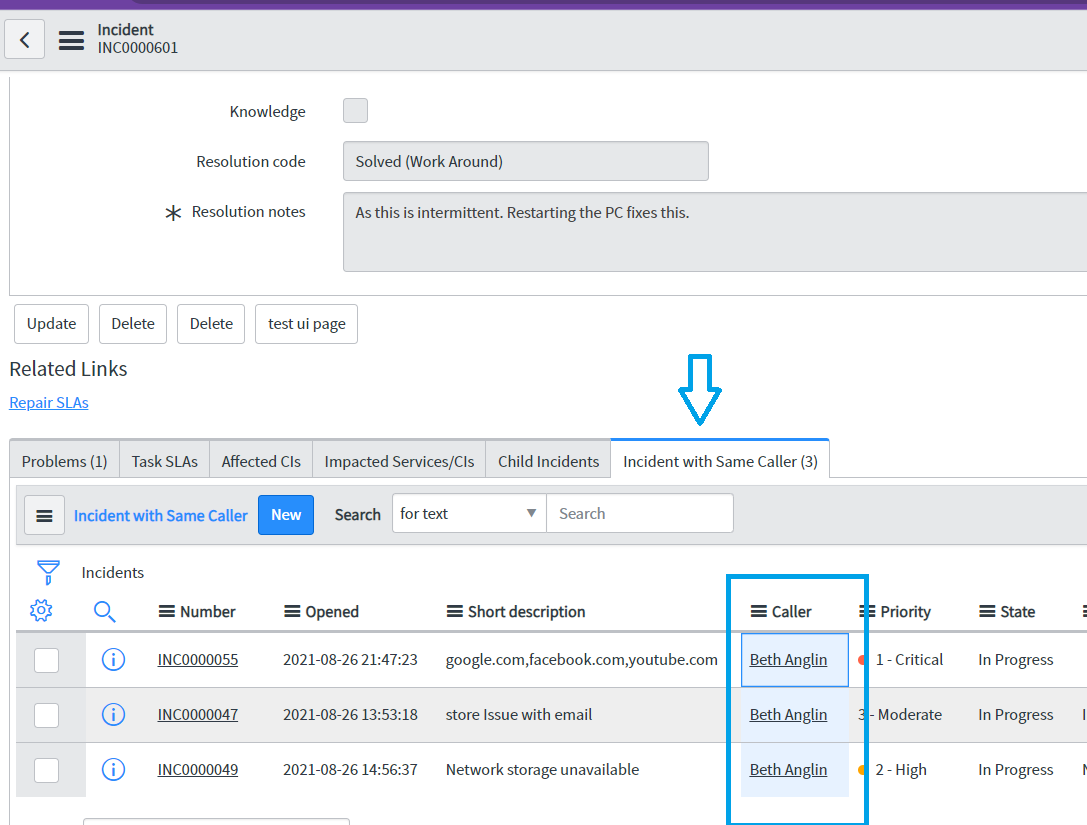
For more details about relationships
click here
This scenario couldn't be achieved by adding related list directly. For such type of requirement we have to create relationships as shown below where custom relation between any two table can be defined.
Relationship to show all incident with same caller as that of current incident :
Once we create above relationships, it will be available in incident related lists to add on the form as shown below :
For more details about relationships click here
How to show specific view while creating new record and different view for existing record?
We can create view rules to change view based on some conditions. Below view rules can be used to show view for new records and existing records on incident table.
This is the View Rule for new records on incident table. For testing purpose 'Cxs_popup' view has been configured for new records. Since 'Created date' is empty for new records so we can use this condition to identify if opened record is new or not:

Result :
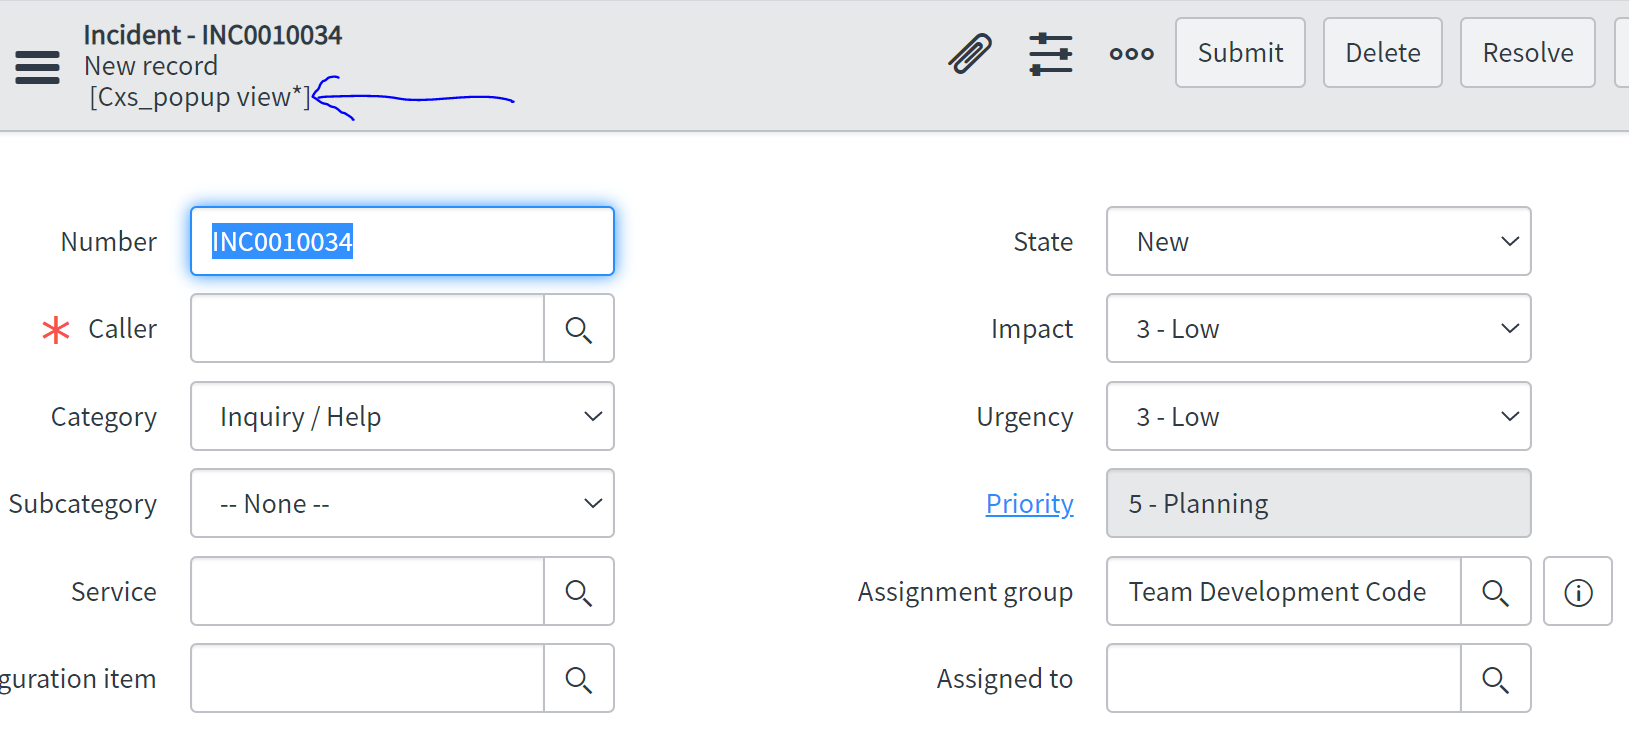
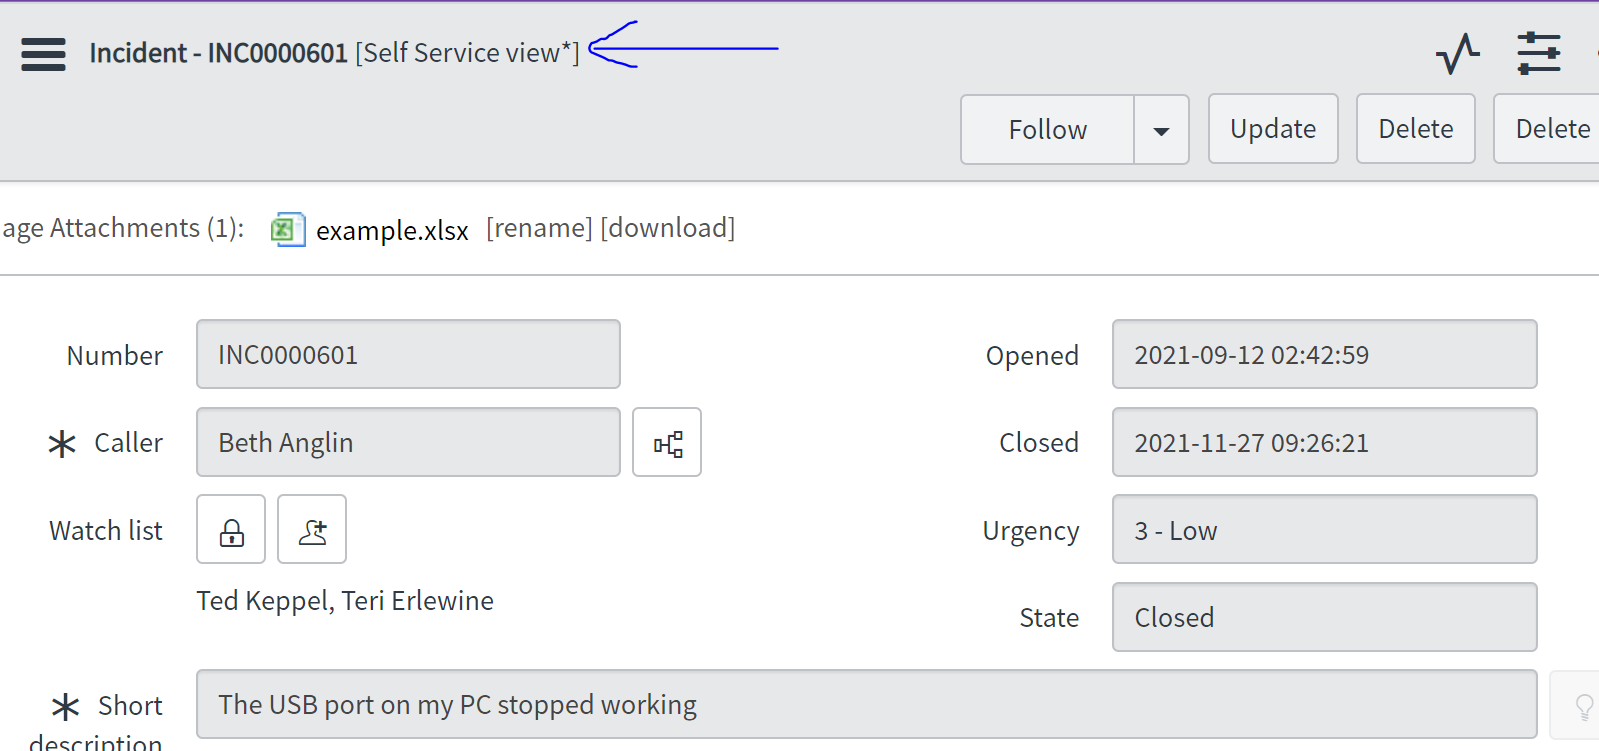
This is the View Rule for existing records on incident table. For testing purpose 'ess'(self service) view has been configured for existing records. Since 'Created date' is not empty for existing records so we can use this condition to identify if opened record is existing record: :

Result :
For more details about View Rules
click here
We can create view rules to change view based on some conditions. Below view rules can be used to show view for new records and existing records on incident table.
This is the View Rule for new records on incident table. For testing purpose 'Cxs_popup' view has been configured for new records. Since 'Created date' is empty for new records so we can use this condition to identify if opened record is new or not:
Result :
This is the View Rule for existing records on incident table. For testing purpose 'ess'(self service) view has been configured for existing records. Since 'Created date' is not empty for existing records so we can use this condition to identify if opened record is existing record: :
Result :
For more details about View Rules click here
How to create single report on multiple tables?
We have Database View functionality in ServiceNow with which we can merge multiple tables into one. So, we can create Database View to merge multiple tables and use the same DB view table to create single report which will have multiple table already.
For more details about DB View
click here
We have Database View functionality in ServiceNow with which we can merge multiple tables into one. So, we can create Database View to merge multiple tables and use the same DB view table to create single report which will have multiple table already.
For more details about DB View click here
How to implement functionality where we can track how much time Incident/Problem/Change was in each state?
To implement the functionality of tracking the time an Incident, Problem, or Change record spends in each state (e.g., New, In Progress, Resolved, Closed), you can use Metrics in ServiceNow. This can be done by creating metric definitions and associating them with the state field of the respective tables (Incident, Problem, and Change).
ServiceNow provides out-of-the-box (OOTB) functionality for tracking the time spent in each state for the Incident table. The system automatically records the time spent in each state using the Metric feature, so for incidents, you don't need to implement it manually unless you need to customize or extend the functionality. The process typically works as follows:
1. Metric Definitions: These define how metrics should be tracked, including the type of metric (e.g., time spent), and specify which field or table should be monitored. ServiceNow has preconfigured metric definitions for tracking time spent in various states of an Incident record.
2. Metric Instances: For each record (Incident, Problem, Change), a Metric Instance is created whenever a state change occurs. The system will log the timestamp when the state change happens, allowing you to calculate how long the record stays in a particular state.
3. Metric Types: Common metric types for tracking time are:
State Duration: Measures the duration a record spends in a specific state.
Elapsed Time: Tracks the total time from one state to another.
For more details about Metrics and Metric Definitions
click here
ServiceNow provides out-of-the-box (OOTB) functionality for tracking the time spent in each state for the Incident table. The system automatically records the time spent in each state using the Metric feature, so for incidents, you don't need to implement it manually unless you need to customize or extend the functionality. The process typically works as follows:
1. Metric Definitions: These define how metrics should be tracked, including the type of metric (e.g., time spent), and specify which field or table should be monitored. ServiceNow has preconfigured metric definitions for tracking time spent in various states of an Incident record.
2. Metric Instances: For each record (Incident, Problem, Change), a Metric Instance is created whenever a state change occurs. The system will log the timestamp when the state change happens, allowing you to calculate how long the record stays in a particular state.
3. Metric Types: Common metric types for tracking time are:
State Duration: Measures the duration a record spends in a specific state.
Elapsed Time: Tracks the total time from one state to another.
For more details about Metrics and Metric Definitions click here
While you're deciding, someone else applying for the same role already started their 15-day plan.
No countdown, no gimmick, just a head start you can still catch up on.
🔒 Secure payment via Razorpay · Instant access after payment
Your story could be the reason someone else lands their next ServiceNow role
If this content made a real difference in your prep, sharing that experience with your network helps other professionals discover it — and we'd love to say thank you with 10 days of premium access, completely on us.
Real Interview Questions & Answers
Questions shared by ServiceNow professionals and reviewed for clarity, relevance, and interview usefulness.
🚀 Power Up Your ServiceNow Career
Join a growing community of smart ServiceNow professionals to stay ahead in interviews, sharpen your development skills, and accelerate your career.